Thursday 20 December 2012

Layout Development


This is my final Layout for my my Illustration page layout in the magazine. I used an image of my own and 2 examples of these two photographers. I also used different colours for the page to make it stand out instead of just doing a normal plain background.


The first thing i did to create my final page layout is i added two headers which is where the names (Andrea Bricco and Henrick Bonnevier) are going to go. I coloured them in blue. I also made it quite large so i when type the names in, i can make the size large too so it is easy for the viewers to read.


The next thing i do is add the text. For both the titles/names i use 'Lucia Handwriting Italic' font and the size 60 and 72. I chose to use a dark blue colour for the titles so it can stand out on the light blue header.


The next thing i do is add the rest of the background. I placed an orange background in the centre so it it behind the header and font


Thursday 6 December 2012

Photoshoot Experiments


After taking our photoshoot of our objects in the style of Andrea Bricco and Henrick Bonnevier, we experimented with the photographs in photoshop to create different effects. This is the final outcome of the experiments that i tried in photoshop. I changed the hue and the contrast in the photograph. And made the background darker so the colours could stand out more. 


I wanted to change the colour of the items to a darker purple so i went to 'Images' then 'adjustments' and then 'Selective colour' so i can choose the colours that i want to change in the photograph. 


I then cropped the bottom so there is not as much dark space in the photograph.

Magazine photo shoot


Last lessons, we had to get  into groups and look at the work that Andrea Bricco and Henrick Bonnevier have done. Then we had to bring our own objects and do our own photo shoot in the same style as Andrea Bricco and Henrick Bonnevier. We had to think about the background we are going to use, the use of lighting, the camera angles, who will set it up and who will take the photos. To do the style of Andrea Bricco we had to place the items on the black sugar paper and sketch an image on the sugar paper.


We placed all the items we brought on the black sugar paper and set it up for the photo shoot. These are one of the two best images that we took of our object and our own interpretation of Andrea Bricco and Henrick Bonnevier's work. We chose to do purple because it is the colour that most of us have the most and it is a bright colour against the black background. The organisation of the items went well especially for the Henrick Bonnevier interpretation because it looks quite professional and similar to some of the work that Henricl Bonnevier has done. To improve we could of cropped out some of the white in the background so the only thing you can see is the black background. And also in the Andrea Bricco interpretation we could of done a better illustration so it shows a lot clearer in the photographs.

Wednesday 5 December 2012

Illustration Analysis

Henrick Bonnevier

This photograph is our own interpretation of Henrick Bonnevier's work. Henrick Bonnevier mostly takes photographs of products and different brands. His photographs are different to any other photographer because he changes the scale of all the objects. For example the small items are big and the big items are small. He took a lot of photographs for vogue magazine which might might be the reason he takes a lot of pictures of brands like Chanel.

He uses a lot of bright bold colours in his photographs so it can attract viewers. It was obvious that he planned the way he was going to take the photographs because of the way the objects were organised. There is not that much space in his photographs because he wants to fill up the image as much as possible with the object that he is photographing. In our photograph we also tries to uses similar colours on a dark background so they stand out a lot better. The colour we used the most was purple. We also tried to organise our object in the same way that Henrick Bonnevier did.

The majority of his photographs are landscape so it can fit in more than one category. I think Henrick Bonnevier is trying to attract viewers that are women because he mostly photographs object such as shoes, jewellery, perfume, purses etc. The only website that has information to support my reading of the art work is a fashion and photography website in which it just shows some of the photographs that he has taken.
Henrick Bonnevier
Our photograph was also landscape so we can try and limit the amount of space to as little as possible so we can fill the image with all the objects.

I like Henrick Bonnevier's photographs because of the colours that he uses and the object that he photographs. If you would see his photographs in a magazine it would catch the eye easily because of the way he has used dominant bright colours. For example the colour of the items are a bold colour but the background is another bold colour but in a different colour.


The two images are photographs that he has taken. Another reason i like it is because it is not what any other photographer or artist has done. Each object in the photograph are different sizes so it looks unique.


Andrea Bricco

This photograph is our own interpretation of Andrea Bricco's work. Andrea Bricco mostly takes photographs of food and in some of them she does some illustration with the food and takes a photograph of them. We couldn't bring in any food so we decided to do the same style but with different object such as shoes, flowers, nail polish, hair clips, and jewellery. When she takes the photographs she uses a lot of light which is mainly coming from above to everything is lit and there are no shadows. She takes a lot of photographs for magazines and cookbooks. She also uses a plain background in most of her photographs. We tried to do our own illustration on the side to do the same style that Andrea Bricco did.

The website i went to for information about Andrea Bricco's work is http://www.andreabricco.com/#/PORTFOLIOS/projects/11/. It shows her official website in which she has links to her photography of her own work, and other things too.

I like this work because it is very different to all the other photographers and illustrators. I like our own interpretation of her work because it shows a lot of bright and bold colours against a dark background just like the photograph we did similar to Henrick Bonnevier.

Andrea Bricco and Hendrik Bonnevier analysis


Context


Andrea Bricco grew up in a small town in Wisconsin in America and her family had a restaurant where she used to work. She used her images mostly for magazines and features in cookbooks When she took her photographs she mostly used plain backgrounds and changed the direction the light was coming from.

Meaning

In most of her photographs the lighting is coming from above so you can see the illustration better. It also looks realistic and in focus. Her images are very clear because of the angle she has taken the photographs from.

Aesthetic

Andrea Bricco positions her items in a very creative way. She does a quick sketch of the food that she is also photographing. I think she does this because the illustration might help clarify what that food is. Her photographs are linked to Natsko Seki because of the way they both use large scales and the illustrations and images are different sizes.


Context

Hendrik Bonnevier mostly takes photographs for Vogue magazine. He also advertises brands like Chanel in his photographs. Most of the items that he uses are items that women are into. Such as perfume, hats, purses, shoes, handbags etc. His photographs are all landscape so he can fit as many item in one photograph as possible. He uses vibrant and bright bold colours in his photographs so it can attract people when they are looking at it. He used a designed composition so he had already had an idea and planned how he was going to take the photograph of the objects and all the colours he wanted to use. His photographs are quite positive since he uses bright colours. But it can also be a bit too busy because there are so many items in the photograph that it is hard to see what the artist is trying to portray. But on the same note, it is also energetic.


  • Hendrik Bonnevier
  • Social artwork
  • Photographs
  • Vogue magazine
  • advertising brands (Chanel)
  • fits in socially. Social context
  • fashion
  • Interiors


Meaning

  • lighting comes from above
  • realistic
  • in focus
  • clear images
  • Pictures are landscape

Aesthetic
  • food to make pictures
  • illustration might help clarify what that food is
  • use of focus
  • Uses vibrant colours
  • designed composition (planned)
  • Limited colour palette


Personal Response
  • 5 senses
  • link to Natsko Seki work
  • positive image
  • Can be too busy
  • energetic

Monday 3 December 2012

Adverts analysis


  • This image was made to advertise Ben & Jerry's ice cream. 
  • The image uses a lot of bold bright colours to attract viewers to the advertisement. 
  • Uses a lot of chunky bold so it is easy to read.
  • Clearly shows what they are trying to advertise because it has an image of the brand. 
  • Scale of the image was meant to look big
  • Scale of the image is important because it is trying to attract people so they can buy the brand.

Tuesday 20 November 2012

Matthew Midgley, Georgina Luck & Natsko Seki analysis


In the second unit, we will be looking at magazines and magazine designs. We will be creating our own magazine by looking at inspirational magazine designers and other graphic designers and artists. 


Content


Matthew Midgley- is a freelance illustrator from West Yorkshire. His influences come from modern illustrative artists. What he mainly does is he observes and then does a quick sketch. I chose this picture that Matthew Midgley has created. He just named it 'Fast food'. It is a simple sketch of a Mcdonald's meal. I think is was created just for his own personal use and to put in his collection of sketches. It was made around the 28th August 2012. I have chosen to anaylse this piece because it is a fairly simple sketch but because Mcdonald's is a well known brand, it looks a lot more interesting than any of the other sketches he has done.

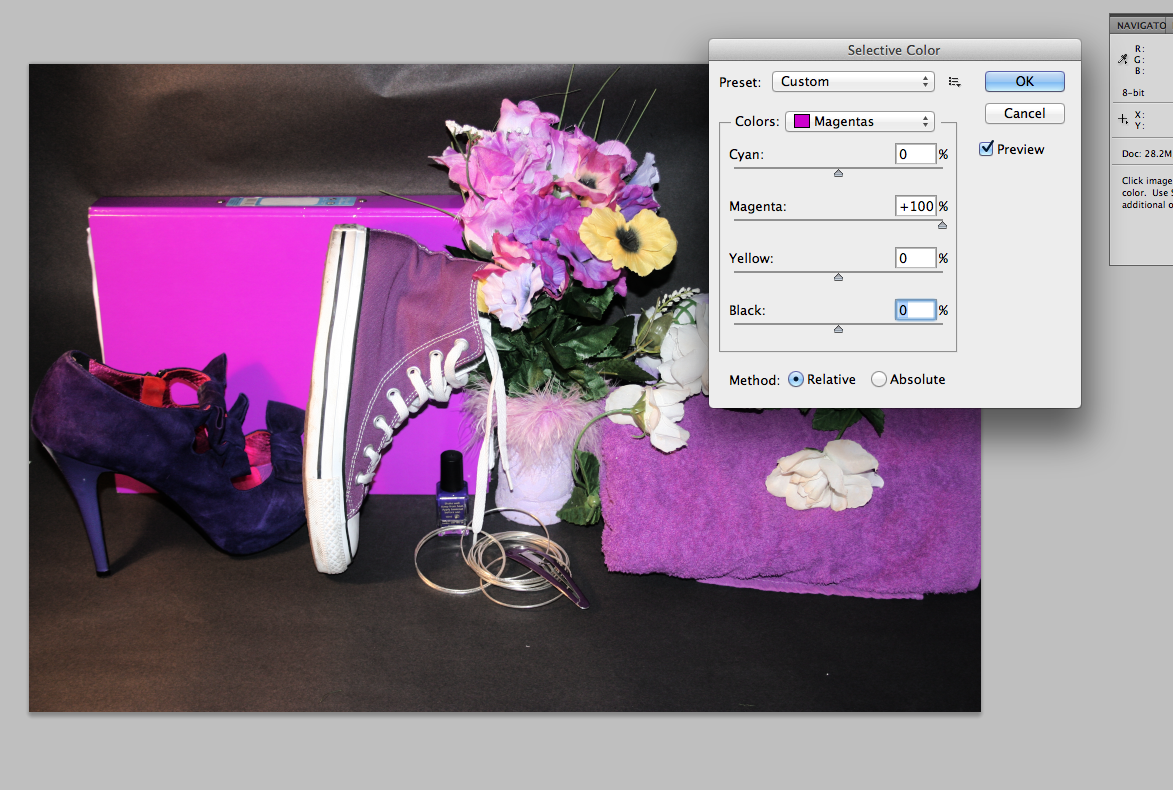
Georgina Luck - is a freelance illustrator from Brighton. She has created a lot of work for packaging, book jackets and outdoor media. She calls this piece 'Hey, your having a baby!' This image is only a small section of the whole piece. It was created for the New York Times magazine in February 2012 and it was an article for shopping habits which can reveal personal information. I have chosen to anaylse this piece because it is quite unique how she creates letters using supermarket items.

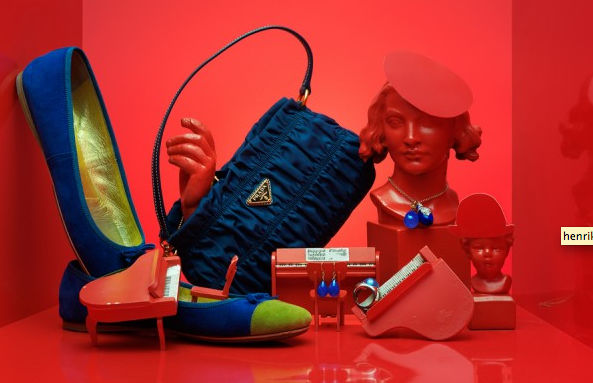
Natsko Seki - was born in 1976 and grew up in Tokyo, Japan but works in London. She usually collages photographs from old family albums and her photographs. She calls this piece 'Brighton'. I think it was created for her own personal use but she cut out different images and stuck it on one piece. This piece of work was made in 2005. I have chosen to analyse this piece because it is unique the way she has created it by gathering different images from different albums and putting them all together to create a new image.

Meaning

For Matthew Midgley's work i went to his website which shows a lot of his sketches that he has done and also explains the meaning of it and what it is, which is useful. Click here.
I think the work has a theme of fast foods because he has done a lot of illustrations similar to this. The title does inform us about the theme because it is exactly what he has sketched.
For Georgina Luck's work i went to her own website which has all her images and portraits on it. http://www.georginaluck.com/
I think the work has a theme and she did it quite well. She spelt out letters using items from the supermarket to portray a message saying 'Hey, you're having a baby!'.
For Natsko Seki's work i also went to her own website which shows all the work and illustrations she has done. http://www.natsko.com/index.html

Aesthetic

Matthew Midgley has used simple materials to create his illustrations such as a pencil, fine liner, acrylic or watercolour paint. This is because most of his illustrations are just rough sketches of objects. He uses light colours, maybe because he uses a lot of watercolour paint. This does give the idea that it wasn't created to look like it should be detailed. The work isn't that big because it was sketched on a piece of paper. The scale of the work isn't that important. The formal elements in this illustration are line and colour.
Georgina Luck has also used simple materials to create her illustration but are a lot more detailed that Matther Midgley's illustrations. I think she used materials such as pencils, fine liner, acrylic paint, watercolour paint, and photoshop. This is to give the illustrating a better effect especially since it was going to be in the New York Times magazine so it has to look a bit more professional. Georgina Luck uses bright bold colours to attract viewers that are looking through the New York Times magazine. The scale of the image is like an A4 size because it is going in a magazine. The formal elements in this illustration is shape and colour.
Natsko Seki has used a lot of photoshop but also mixed with paint and fine liner and old photographs in which she has suck together to create a new piece. I think on top of sticking photographs she has used photoshop to maybe brighten the colours so it looks more attractive to people viewing the illustration. The formal elements in this illustration are scale, colour and shape.

Personal Response

I have chosen to look at all these pictures because they are the most unique illustrations that they have all created. They are all bold in colour and the shapes and scale of the images are unique to any other illustrations.

Thursday 15 November 2012


Typography Project Evaluation


1. What did you have to do? How did you come up with the ideas for this project?

I had to create a design for a final printed t-shirt. I got my ideas from Si Scott but i changed it to make it my own. I had to use typography on my final t-shirt design. I created my own typography in Illustrator by typing the phrase i want on my t-shirt and adding effects to it such as "twirl' to change the shape of the letters. I wanted it to look a bit like Si Scott's typography:


2. Write about the creative 'journey' of the project: How did you project and ideas evolve from start to finish through experimentation and research?

I researched Si Scott's typography firstly 


3. Who inspired your final outcomes? You MUST talk about who has inspired your work, and include images and links of/to them


4. What saying or expression did you use? What technique did you use? Was there a link between your 
materials and the words used? What was it?

5. What do you think you have done well? What has 
worked? Are you happy with your final outcome?


6. What do you think you could have improved in your final outcome? There will be something - nobody is 
perfect


7. Conclusion: Overall how did you find the project? Would you like to complete more typographic work in the future?
8. Publish your blog post! 

Checklist

Setting up a Blog
Blogging: Uploading hand drawn type (blog post)
Homework
Documenting your hand drawn typography onto your blog - including in-depth analysis of the work of Hennie Haworth and James Hancock (blog post) see lesson post for full details.

Watercolour Typography (blog post/sketchbook)
M&M Paris Typography (blog post/sketchbook)
Kinetic Typography (blog post/sketchbook)
Experimental Type: Furry Font/Pin & Thread (blog post)
Experimental Type: Object Typography/Vladimir Koncar (blog post)
Experimental Type: Food Fonts/Ed Rushca (blog post)

Digital Calligram (blog post)
Fontstruction (blog post)
Si Scott (blog post/sketchbook) 
Bleaching & Heat Transfer (sketchbook/blog post)
Reviewing Experiments (blog post)
Mind Map & Initial Ideas (blog post)
Moodboard (blog post)
Developing ideas (blog post & sketchbook)
Printing t-shirt (t-shirt & blog post)
Photoshoot (blog post)
Final evaluation (blog post) 


Wednesday 14 November 2012

Final T-Shirt Design


This is my final t-shirt design. I did it in the style of Si Scott but i tried to make it my own by making the letters a bit more deformed and edgy. I also made each letter a different colour so the swirls can mix in with each other and create a good effect.
Also i thought about how it would appear on my t-shirt and i wanted it to be colourful


This is the previous design i thought about doing but in black only. It is exactly the same design as my final t-shirt design just without any colour.


This is the typography that Si Scott did

Tuesday 23 October 2012

M&M Paris


In this lesson i took a photograph of myself in photobooth and created a clipping mask in photoshop inspired by the work of M&M Paris.


Digital vs Hand made watercolour


In this lesson, I created our own digital watercolour and hand made watercolour. I used photoshop to create the digital watercolour inspired by the work of Natsuki Otani.
The image to the left is my hand made watercolour. I decided to do something simple and chose a simple word (Wish). To do this i used watercolour paint and a small paintbrush. I first sketched out the wording pencil in bold capital letters. I then carefully used different colour in my watercolour pallet and tried to make it have a watery effect. I don't think it came out as well as i had expected but to improve it i could of added a bit more water so the colours aren't as bold.

This image is the digital watercolour that i did in Photoshop. I followed the tutorial but also made it my own by adding different colour to each letter and also changing the word from 'Water' in the tutorial to 'Watercolour'

Hand drawn typography and Haworth and Hancock analysis


In this lesson, we looked at Hennie Haworth and James Hancock's typography. We made our own version of their work by painting our hands to make the Capital and the small letter. (e.g A a)


I decided to make a simple letter which is the same shape when it is a small letter and when it is a capital letter.


Here is a picture of my own hand-drawn typography:


To do this i first had to decide which letter i was going to do. I found it difficult to think of a letter which i can change easily from a Capital letter to a small letter so i just decided to do a letter which looks the same in Capital and small which is the letter 'C'. I then used blue acrylic paint to paint on the side of my hand to make it look like the letter 'C'. I took a photograph of it.

Monday 22 October 2012

Reviewing Experiments


  • 1. Which materials and techniques have you experimented with during the typography project?
  • Bleach and heat pressing our designs on to a piece of cloth.
2. Have you explored and developed your ideas imaginatively? How have you demonstrated this? (give examples, link to posts or include images) 
I used a typography experiment that i have previously done in class to heat press on the cloth as my idea.


3. Have you research a diverse range of artwork and completed this on your blog? who have you analysed? is you analysis in-depth? (again give examples and link to posts) 

  • I analysed Si Scott and the design i chose to do for my heat press was inspired by Si Scott's typography. I researched a lot of his typography with the swirls because it is interesting and you can easily do something similar yourself. 
I got some images from: http://www.siscottstudio.com/


4. Have you explored a range of ideas around the theme of 'Sayings and Expressions' within your experiments? What are they? How have they informed your ideas?

  • I chose to do a different kind of saying and expression which is quite personal to me. i did 'You on your own.' The meaning behind it for me is that you cannot trust anybody apart from yourself. 


5. Have you refined / developed your outcomes through experimentation? How? 


6. Have you annotated, in detail, your experiments and developments on your blog and used this information to help you improve? 


7. Which techniques / experiments have been most successful? Why?


8. Which techniques / experiments have been least successful? Why?


9. Which techniques / experiments will you be developing further for your final outcome? Why? 


10. What else can you do to further develop the techniques / experiments you want to use for your final outcome? 

Thursday 18 October 2012

Si Scott Typography


This is my interpretation of Si Scott's typography. His work inspired me to do it in his kind of style but to mess around with the swirls a bit more. I tried to add swirls to the edges of my work to make it look more interesting. I also twisted the O's so the letters itself doesn't look to simple. I stretched out some of the letters such as the N to give it a better effect.


Wednesday 3 October 2012

Kinetic Typography


In this lesson, we created our own typography on illustrator. We did different fonts and effects on the font to either make it more blurry, or bulge out, or stretched. 

To create these we used the tutorial that we were given on the Graphics blog.


These are the tutorials that we had to watch so we knew how to do the different typography on illustrator. We based out work on the artist Heebok Lee. We chose to look at him because his words (the action of them) matched with the message that he was trying to portray. For example, the word 'big' enlarged so the action could fit with the word. 


In-depth analysis Oscar Wilson


CONTENT

The graphic designer that created this work is Oscar Wilson. And this piece s called Gil Scott-Heron, The last holiday A memoir which is a picture of a man that is made out of different words and phrases.
Oscar Wilson was founded in London and specialises in image creation and hand crafted typography. Most of his creations have a meaning towards them because of the words that are written in the image. He may be trying to portray a message to the target audience.

This piece is a Typography and photography piece because he took a photograph of the man and used hand-made typography to fill in all the shapes of the mans face. He's used different shades of brown and black so the features stand out more.
This work is an illustration that has been made for Gil Scott-Heron book cover.


MEANING


Click here for Oscar Wilson's website. This link goes directly to Oscar Wilson's own website of his work which he called 'Studio Oscar.' This contains all of his typography that he has made. It also shows development of the different typography he has created and the names of them. I have also looked at another website that had a lot of Oscar Wilson's work on it. Other website
Portrait and illustration art/Typography because he uses a normal picture of a man and uses hand made typography to finish it off.
I think the work is mainly about a person because it was created for a book cover which is called Gill Scott-Heron: The last holiday, a memoir which is a book about dreams. At the back of the book it says "Dr. Martin Luther King had a dream, Stevie Wonder had a dream, This is a book about dreams". I think the work shows a person that may be related to dreams. Maybe an inspiration idol from the past.
The words that Oscar Wilson uses in the image are "Revolution, New York, We almost lost detroit, Dream, The government you have elected is so inoperative" which i think shows a deeper meaning behind the work which relates to past events that have happened.

AESTHETIC

To create this hand made typography the materials Oscar Wilson used a camera to take a picture of the man or if not he got the image off of the internet. For the hand made typography he used pencil to do a rough sketch, black pen to go over the final outline and colours to get the different shades of brown and black. And to finish it off he used illustrator or photoshop to refine the edges and colours of the typography.
It was made by drawing it out and then refining it in illustrator or/and photoshop. The skills he used were mostly hand made skills so drawing the words in the right position and the right size so all the words and sayings can fit in the image easily.
It's quite small because it was created for a book cover but it is big enough for people to see clearly what the image is and the words that are written inside of it.
It looks like he is trying to use the same colours but different shades so you can still see the image clearly but is also shows that he knows what he was doing because it turned out well. Another key element is the size of the words. He has used different sizes for the different words and phrases used so they all fit in nicely in the image.

PERSONAL RESPONSE

1. Why have you chosen to look at it?

Because i like the way he uses typography as well as imagery of people/things.

What was your reaction to the work?

Surprised 

What do you like/dislike about the work?

I like the fact that he has used simple colours that look alike but you can still see the image clearly. 

Does this piece remind you of anything?Why?

Have you seen work by another artist/designer that is similar?Who? And what is it that reminds you of their work?


This image is similar because it has the same kind of image in the background. The words are quite smaller. This piece of art is by Sarah King.


Wednesday 26 September 2012

My typography inspired by Vladimir Koncar


Vladimir Koncar is a experimental typography and creates a lot of different types of typography using basic materials e.g soil, pennies stems. In groups we got different materials and we had to write down our own ideas for different words, sayings and expressions that relate to the material we were given. We decided to just use words that relate to the material because the amount of material we got were limited. One of the materials we got were petals and stems and we made the words 'Peace', 'Love' and 'Petal'. Another material we used were pins and we made the word 'Sharp' out of them. And the last material we used were rulers and we created the word 'Straight'. For the rulers we changed the word from 'Straight' to 'STR8' as we didn't have enough rulers.


This is one of Vladimir Koncar's experiments. He has used gummy bears (sweets) to spell out the word 'Hello!'.
I think this experiment was very well done because it is very well presented with al the colours. It also shows clearly the word he is trying to portray to the audience.